
Let me tell you something about drywall that every homeowner eventually learns the hard way: it looks simple. It’s just a sheet of gypsum with paper on both sides, right? How hard can patching a hole possibly be?
Famous last words.
I’m Matt Jaques, the handyman behind Jaques of All Trades here in Eureka, California, and in the years I’ve been crawling through attics, fixing wobbly toilets, and yes — patching more walls than I can count — I’ve seen what happens when drywall repair goes sideways. Bubbled patches. Cracks that come back three weeks later. Paint that never quite matches, no matter how many trips to the hardware store. And more than a few calls from homeowners who started the job on a Saturday morning with YouTube confidence and ended the weekend with a hole twice the size they started with.
So let’s talk about drywall repair the right way — what causes it, what actually fixes it, and when it makes more sense to put the spackle knife down and call someone who does this for a living.
Why Drywall Gets Damaged in the First Place
Drywall is tough enough to last decades, but it’s not invincible. In Humboldt County especially, moisture is a constant reality. The coastal fog, the rain, the way humidity seeps into older homes — all of that puts stress on walls over time. Drywall can swell, crack, bubble, or grow soft in spots that you won’t notice until you poke it and your finger goes right through.
Beyond moisture, the most common causes I see are:
Door handles that meet walls faster than intended (that’s a polite way of saying someone was in a hurry). Furniture that got moved without quite enough care. Kids. Pets. The weird settling that happens in older Eureka homes built on ground that has its own opinion about staying level. And my personal favorite — the homeowner who was “just going to hang one picture” and discovered the stud wasn’t where they thought it was.
According to the U.S. Gypsum Association, drywall accounts for roughly 90 percent of interior wall construction in American homes — which means when something goes wrong with your walls, there’s a very good chance drywall is involved. Understanding the material matters if you want the repair to hold.
The Three Levels of Drywall Damage (And What Each One Really Needs)
Not all drywall damage is created equal. Here’s how I think about it when I walk into a job:
Level 1 — The Surface Stuff. Small dings, nail holes, hairline cracks. This is genuinely DIY territory for someone who’s patient and doesn’t mind a little sanding. A lightweight spackle, a putty knife, a sanding block, and primer before you paint. The mistake most people make here is skipping the primer and painting straight over the patch — then wondering why there’s a dull spot on the wall that stares at them every morning.
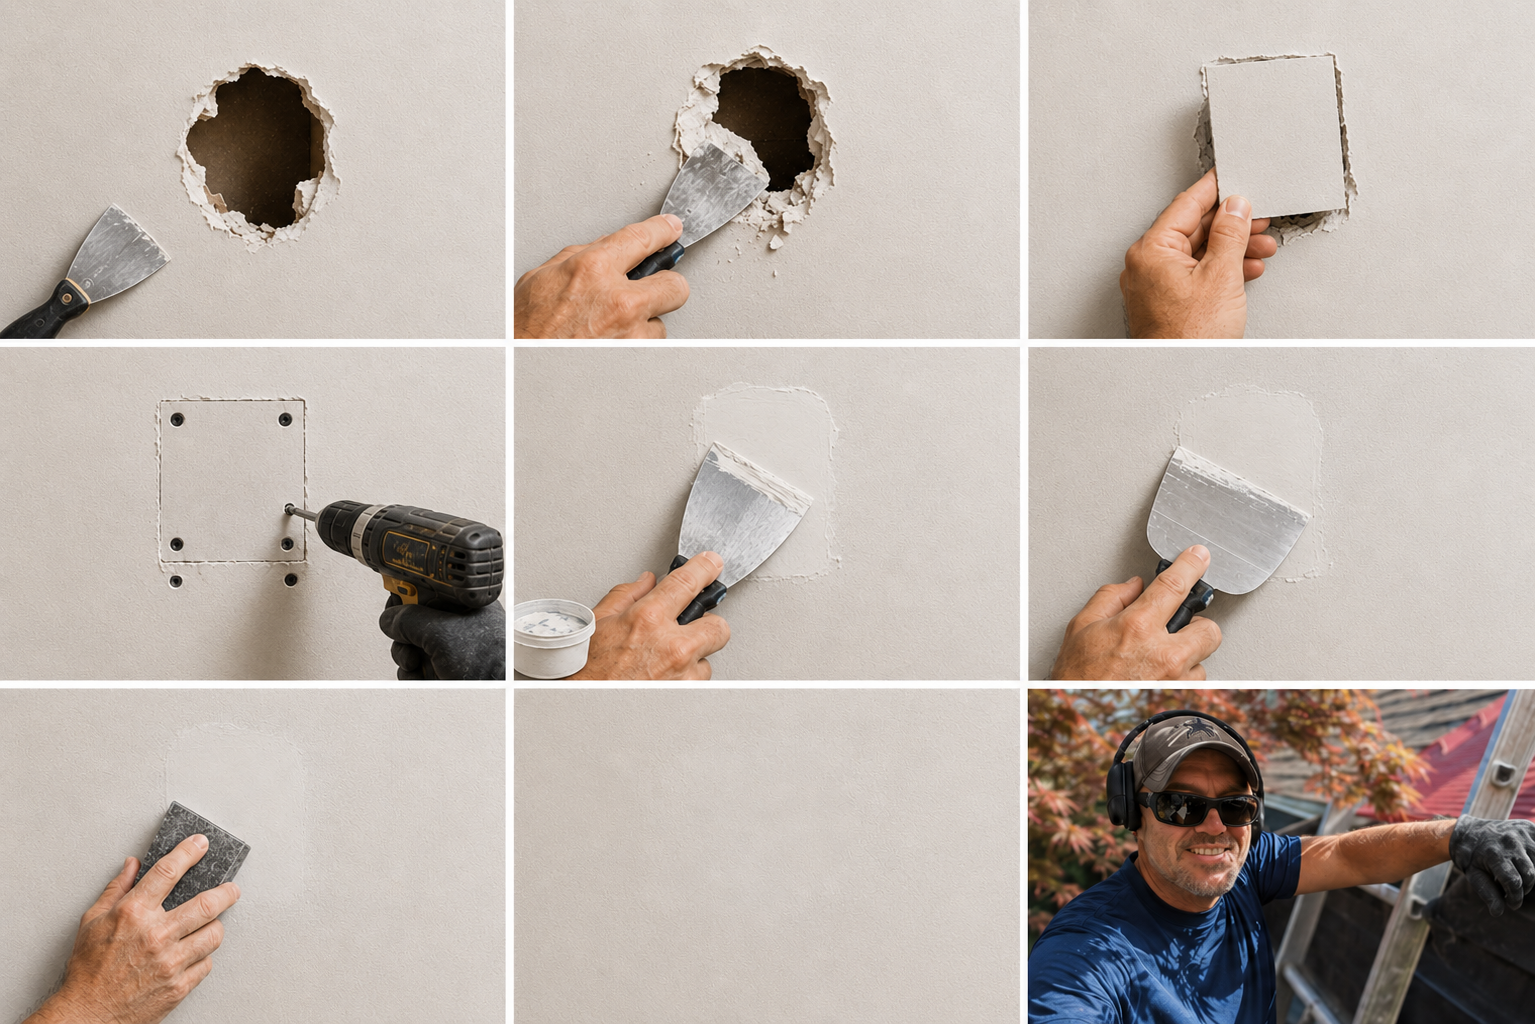
Level 2 — Medium Holes and Water Damage. We’re talking holes from three to six inches, or any area where moisture has done its thing. This is where it gets tricky. You need a backing piece, mesh tape, joint compound in multiple thin coats, and enough patience to let each coat dry completely before adding the next. Rushing this process is why so many patches crack. If there’s been water involved, you also need to address the source before you close the wall — otherwise you’re just decorating a problem.
Level 3 — Large Damage, Structural Concerns, or Anything Near Electrical. Put the tools down. Seriously. A large section of damaged drywall requires cutting back to the nearest studs, fitting a new panel, taping, mudding, feathering the edges so they disappear into the surrounding wall, priming, and painting — all while making sure the texture matches what’s already there. If the damage is near wiring or you can see signs of mold behind the drywall, that’s not a weekend project. That’s a professional situation.
For any job that’s moved past Level 1, my drywall repair services exist precisely for this reason — to save you time, money, and the particular frustration of a patch that looks worse than the original hole.
The Texture Problem Nobody Talks About
Here’s the part of drywall repair that DIY videos consistently underestimate: texture matching.
Most homes don’t have flat walls. They have orange peel, knockdown, skip trowel, or some other texture that was applied when the home was built and hasn’t been thought about since. When you patch a hole and paint over it, the smooth patch sits inside a textured wall like a bald spot. You can see it from across the room. In certain light — especially morning sun through a west-facing window — it’s all you can see.
Matching texture is a skill that takes practice. There’s no shortcut. I’ve been doing this long enough that I can look at a wall, identify the texture style, and replicate it in a way that blends. That’s not me bragging — it’s just the reality of hands-on experience. The Drywall Finishing Council recognizes five standard levels of drywall finish, with Level 5 being a skim coat over the entire surface — often the only true way to achieve a perfect match in high-visibility areas.
Why Homeowners in Eureka Trust Jaques of All Trades
I started this business because I genuinely enjoy solving problems that other people don’t want to deal with. Drywall repair sits right in that category — it’s not glamorous, it’s not fast, and it’s easy to do halfway. Doing it right requires patience, the right materials, and enough experience to know what the wall is trying to tell you before you start filling things in.
When you call me out for drywall repair, here’s what you actually get: a thorough look at the damage before I touch anything, honest communication about what the repair involves, and a clean workspace when I leave. I’m not trying to upsell you on work you don’t need, and I’m not going to patch a symptom while ignoring the cause. If the hole is there because of a plumbing leak or a settling issue, I’ll tell you.
Humboldt County is a specific place with specific conditions — older housing stock, coastal humidity, buildings that have seen a lot of weather and a lot of years. I know these walls. I work on them every week.
When Should You Actually Call a Handyman for Drywall?
If you’re still on the fence, here’s my honest rule of thumb: if the hole is bigger than your fist, if there’s any sign of moisture or mold, if you can see wiring, or if you’ve already tried once and it didn’t come out right — call. The cost of a professional repair is almost always less than the cost of fixing a DIY repair that went wrong and then having a professional finish the job anyway.
According to This Old House, even experienced DIYers often underestimate the number of coats and the drying time required for a seamless drywall repair. Rushing those steps is the single biggest reason patches fail.
If you’re in Eureka or anywhere in Humboldt County, you can reach me through the drywall repair services page or just give me a call or text. I’ll be straight with you about what the job needs — which, in this trade, is the most valuable thing I can offer.
Because at the end of the day, a good drywall patch isn’t one you can see. And that’s exactly what we’re going for.

Leave A Comment